Frequently Asked Questions

From the list below choose one of our Frequently Asked Questions. If you have a question which is not in this section, please contact us.

Ram Print FAQ's

It’s all you really need to know about printing!
We’re Convenient Fast turnaround

Order by phone, email, or FTP, 24 hours a day
We’re Knowledgable

Skilled staff of consultants, designers & craftsmen with an average of 20 years experience and only the latest in high-tech equipment
We’re Responsive

We strive to make sure you get what you want, on time and in-budget
We’re Cost Effective

We have multiple options to produce your job giving you multiple choices for savings

At Ram we can blow up your file to any size. In-house and within 24 hours we can put your photos on canvas, vinyl, photo paper, or just plain blueprint paper; and at sizes up to 44″ wide by 100 feet high. All of our machines will output a resolution far higher than your camera will support. That being said, if your audience will be viewing your photo up close (within a few feet), you will want your resolution to stay above 200 dots per inch. (200 dpi is considered “photo quality”).

We’ve constructed a little chart below that shows the resolution of your photo as you blow it up. You can read it by finding the resolution of your camera across the top, and cross-referencing it with the size of your photo down the left. For example, if you have a 5 megapixel camera, and you want your photo enlarged to 10″x12″, you will end up with 205 dots per inch resolution. Conversely, if you just want to see how big your photo can get and still look good, just look down the 5 MP column until the green shading ends (at the 200 dpi level.) Follow it to the left and you’ll see a 10″x12″ is the largest photo you can get at photo quality. The yellow shading indicates areas that may be getting blurry up close, but depending on your needs may be acceptable to you. Just come in and we’ll show you examples of the various resolutions.


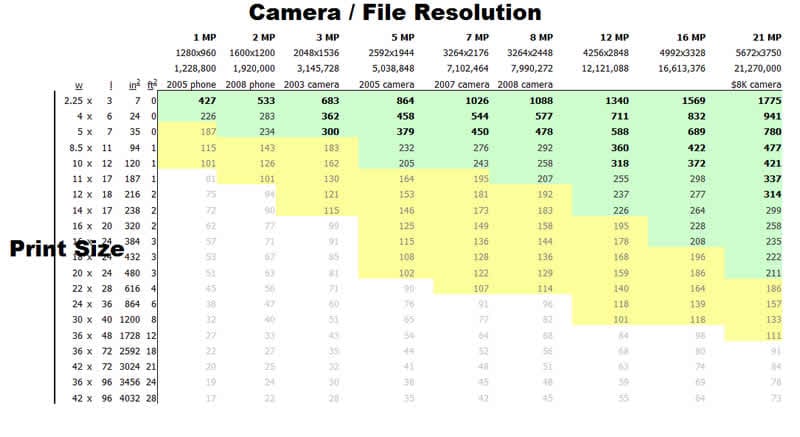
Again, we can print up to 2400 dpi on any medium, so don’t worry about whether we can handle it.  Just get us the best file you can and we’ll work magic!

You asked for a photo, my logo, etc. My software’s asking me what resolution to save it as.

Three short answers:

1. “it depends.”
2. “300 dpi at 100% size.”
3. “as high as you can give us.”

  1. Long answer, because if you’re reading this, “it depends” isn’t a good enough answer. So here are some basic guidelines:
  2. DPI stands for “dots per inch.” 200 dpi constitutes “photo quality,” and most of the work we do is at least 300 dpi. That means if you were to zoom in far enough, each inch of your picture would be comprised of at least 300 dots. The dots will be different colors and different sizes, and without a microscope you probably can’t see them, but together they would make up a print of such quality that most people would not be able to tell it from a photo.
  3. Most pros say the human eye can’t see resolutions higher than 200-300 dpi. But there are enough people walking around who can correctly discern up to 600 dpi; Ram’s machines can run many times that resolution.
  4. It also depends on how close the viewer is to the print. Up close, many people can discern a 300 dpi from a 200 dpi print. From 30 feet away, few can tell a 300 dpi from a 20 dpi print. There are big equations to tell us what a 20/20 eye can see from how many feet, but we’ll generally always be printing far above what a human eye can see. Our banner printer can print up to 2400 dpi, 42″ wide. That means most people can’t see any imperfections with a magnifying glass, let alone from 30 or 300 feet away.
  5. The reason we say 300 dpi “at 100% size” is that if you increase the size, it lowers the resolution. So if you pull a 72 dpi square picture off the internet, it will be 1/4 the size by the time it’s a usable 300 dpi. You only have 72 dots per inch to work with on that file, so it would have to be reduced 75% to find 300 dots to crowd into that inch.
  6. “Megapixel” on your camera means 1000 dots/pixels. So a 3.1 MP camera has dimensions that multiply out to roughly 3,100,000 dots if printed at 100% size on a really honest printer (normally 2048×1536, which actually equals 3,145,728).
  7. So if you take a picture on your camera and it saves it with dimensions of 3000×2000 dpi (6 MP), you can estimate that at 300 dpi, a 3000 pixel-wide picture can be printed at 10″ wide. (3000/300=10″) by (2000/300=6.67″), therefore a 10″x6.67″ print.
  8. If you have a logo or illustration, it may already be in a .eps format. Simply put, that means it can be scaled to ANY size with ZERO loss in quality. That doesn’t work with photos, but with illustrations and logos it’s ideal.

Please call or email if you have any questions.

Of course you can email your files!  You can email them to any of the email addresses listed on our contact page.  The most common contact email is [email protected], which goes to the production staff at the front desk.

  • We can really accept any size email, but unless you have a monstrous internet connection on a premier domain, you probably can’t send huge files.  If you’re dealing with something large, try the uploader on this website. 
  • PDFs are best, just be sure to embed the fonts and include the images.
  • Any file format is fine, just be sure to embed the fonts and include the images.
  • Please name your file something we’ll recognize.  “Resume.doc” is not as easy to distinguish from the hundreds of other files we receive as “JohnDoeResume.doc”  Again, all things being equal, PDFs are better than DOC files (for printing, employers often want doc files.)

YES!  Design is what we do.  We can help you with any design project at any point along the way.  You may be surprised how many corporations use us for design, and how many ubiquitous brands started as Ram customers. 

We can design business cards, letterhead(s), envelopes, folders, brochures, flyers, posters, tabs, banners, invites, announcements, greeting cards, labels, stamps, logos, signs… pretty much anything from a single-line sign to a 200-page full color book… we can guarantee you are familiar with our work, as we’ve been a dominant Bay Area design house for close to 40 years.  Just let us know what you need and watch the magic happen!

We don’t do web design directly, but unofficially we can still hook you up.  Ram is, and should be your marketing safety net–the wall of professionalism between your expertise and your customers.  You can trust us for all your Marin County services and printing.

My company is a school.  Do you do printing for schools?  
OR
My kid’s about to graduate from (Kindergarten/Junior High/High/College/Master’s/Doctorate) school.  Can I get my graduation announcements from you instead of the guy the school “makes” us go through?

Short answer: Yes, yes, and yes.

Long answer: Ram does printing for a great percentage of the schools in the area.  We do banners, 3-part forms, motivational charts for your wall, etc. for many of the cities and schools in Marin, Napa, and Sonoma.  

If you work at a school, and have been a loyal customer of Ram, trust us with your recognition products.  Whether a Kindergarten or a University, we’re in your league and can get you the best products made for less than you’re currently paying that salesy-salesperson.

If you have a son or daughter in school, we can make or get all kinds of recognition products to make him proud of his world.  You can expect the same perfect quality from our class rings and graduation announcements that you do from our printing; and you can expect an understanding of the market and a behind-the-scenes economy of scale to allow us to be considerably cheaper than the much lower quality product you can get elsewhere. 

Do you guys do shipping?

If you order printing from us, we can ship it anywhere in the US for you. There are no trick fees to get that done, either–just our massively discounted corporate shipping rate plus a few bucks for labor. The law these days prohibits us from taking a package from you to ship on our UPS account, but there are local UPS and FedEx boxes to make that as smooth as possible for you. As always, call if you have any questions…

How to Make Grid Paper

You just can’t find grid paper anymore.  You know, paper with a pre-printed grid used for graphing or charting or learning to draw.  Well, at Ram we can make you grid paper.  Letter size, 11×17, even blueprint size.  We constantly have math teachers, architects, and parents coming in asking for grid paper, so we’ve decided to write a little primer on the easiest way to do it.

Here’s how to set up a file if you want to do it yourself.

  1. Open a new document on excel. 
  2. Select All (either by hitting Ctrl+A, going to Edit: Select All in the menu, or clicking in the null box on the top left of your workspace.)  
  3. Click and hold down the button over the small vertical divider between two columns across the top (between Column B and Column C, perhaps.)  Adjust it to a random number.  This will adjust every column to that new width.
  4. Click and hold down the button over the small horizontal divider between two rows along the left side (between Row B and Row C, perhaps.)  Adjust it to the same number as before.  This will adjust every row to that same height.
  5. Right click anywhere in the blue area and click Format Cells. 
  6. Choose Borders. 
  7. Select Outside. 
  8. Select Inside. 
  9. Hit OK and you’re done!

Realistically before you hit Outside and Inside you’re going to want to adjust the thickness and shading of the lines.  Unless you’re building a crossword puzzle you probably don’t want solid 1pt black lines–you probably a fine dot screen for the line pattern and 50% grey for the color.  But this will also depend on how much detail your printer can render.  Quite often too fine a pitch or too light a color may just not show up, or too heavy a line will, on a cheap printer, smear.  So you’re basically just guess-and-check-ing right now pursuant to make it look right on your screen.

Now to print.  Print settings will vary by what kind of printer you have, so we’ll just give you the basics.

  • File
  • Print
  • Print pages 1 to 1

If the squares come out too large or too small, the easiest thing to do is just to repeat steps 3 & 4 above, adjusting for a larger or smaller sized square. Then just guess and check.  Yes, you could measure it and do the calculations in advance, but there are way too many printer variations for that to hold up.

Done!  Again if you need a bunch of copies, or one poster-sized copy to hang on the board, or your prints cut to a particular size, or printed on odd or thick paper; call us.  And as always, call with questions!

Design and File FAQ's

Someone told me my file has to bleed.  Why oh why would I want my files to bleed?  Didn’t Arnold Schwarzenegger say, “if it bleeds, you can kill it!”?

Full bleed is printing from one edge of the paper to the other without the standard borders by which most personal printers are limited. This is useful for printing brochures, posters, and other marketing materials. Often the paper is trimmed after printing to ensure the ink runs fully to the edge and does not stop short of it.  A bleed is the extra-size designed into your document which thereby allows for paper and design inconsistencies.  In other words, if the printing goes to the very edge of your 4 x 6 document, you’re safest designing the document at 4.25 x 6.25, so there’s a 1/8″ play on all four sides.

Bleeds in the USA and UK generally are 1/8 of an inch from where the cut is to be made. Bleeds in Europe generally are 3 to 5mm from where the cut is to be made.

Why?  Because there is simply no technology that allows accuracy to the millimeter.  Your printout may not be perfectly straight, your file may not be perfectly centered on the page, the large stack of paper may be a mm off between the top and the bottom of the stack… From sheet to sheet the printing press or copier will have some play, too, leaving the registration of the image slightly “off.”

When you try to cut out a photo with scissors, you most often leave a tiny slice of white border around your picture, which you frustratedly fight for the next 3 minutes.  Because you’re not that accurate.  Well, we are as accurate as technologically possible, but that’s still not perfect. If you don’t leave us any space for play, you will end up with some white borders on your photos, business cards, etc.

Sometimes we are able to create a bleed for your file, i.e. blow up the photo a bit or create a fake corner, but if your design is too complex or too tight, we may have to ask you to redesign your piece (or charge you to do it ourselves.)

Die-cuts sometimes require a 1/4″ bleed from where the page is intended to be cut; this is because of the possible movement of the paper during the die-cut procedure.

Portable Document Format (PDF) is a file format created by Adobe Systems, and fundamentally for document exchange. (Adobe makes all the big production software also, so that adds in compatibility also.)  PDF exists to represent documents in a manner independent of the application software, hardware, and operating system.  Each PDF file encapsulates a complete description of a document that includes the text, fonts, images, and vector graphics which the documents contain.  PDF is an open standard that is read and written by many programs and up to 90% of computers. 

So how do you make a PDF?  On any program, hit File: Print.  If you have a printer-looking icon called Acrobat Distiller, or something with PDF in its name, it’s probably your PDF writer.  Printing to it will create a PDF.  If it gives you any options, choose “press quality” and “300 dpi”.  Mac OSX supports PDF natively, which means you should just be able to hit File Save As PDF in most programs…

InDesign is a powerful program; perhaps too powerful for most of its users.  Most files we get in InDesign format are almost unreadable because of advanced features used incorrectly, leaving empty boxes, unattached or improperly attached fonts, etc.  We can’t quite call it InDesign new to market” anymore, but it is a program that is only now gaining popularity with designers, and only so because it comes bundled with the ubiquitous and necessary Photoshop and Illustrator packages.  We use both InDesign and Quark (as well as Photoshop, Illustrator, Flash, Dreamweaver, Gimp, and everything else down to Microsoft Word.) 

As always, if you are submitting a file from any program, please include a PDF.  We will normally print straight from the PDF.  Nevertheless, it is always wise to include the original files in case any changes need to be made.  “Changes” doesn’t mean we will mess with your file.  But we may need to adjust the size of the bleed, remove the crop marks or bounding box, or convert the process colors you included into the Pantone colors you demanded.  If you had a designer create the file, it will always be quicker and of much more value to have us adjust it than to send it back to your freelance designer.

With InDesign, you will need to prepare your file for printing.  This will include all the ancillary files, fonts, images, etc. in one package for us.  There’s no point submitting a file to us if it doesn’t include any fonts or images!  Even if it looks fine on your screen!  Anyway, if you’re using InDesign, here is how to prepare your file:

  1. From the FILE menu, choose PACKAGE. 
  2. Click OK (or fill in the instructions, but print them out as well.)
  3. Check “Copy Fonts (roman only)”
  4. Check “Copy Linked Graphics”
  5. Check “Update Graphic Links in Package”
  6. Optional:  “Use Document Hyphenation Exceptions Only”
  7. Optional: “Include Fonts and Links From Hidden Layers”
  8. Optional: “View Report”

Save it to your Desktop.  You may want to create a new folder to put everything in.  Then, if you’re going to email or FTP it, throw the PDF in there and zip that folder and send it to us.  Otherwise, throw the folder and the PDF onto your thumbdrive or CD, and get it to Ram.  Now your part is over and you can trust your job will be perfect within a few days.

First off, if you have Quark XPress, you may not need this page.  You know that outputting to PDF is the most important thing in the world, second only to Collecting for Output to accompany your PDF in case anything ends up askew on preflight.  Here’s How:

  1. FILE
  2. COLLECT FOR OUTPUT
  3. Don’t check “Report Only”
  4. Check everything else.  “Layout,” “Linked Pictures,” “Embedded Pictures,” “Screen Fonts,” “Printer Fonts.” 
  5. “Color Profiles” is optional.

If you’re emailing or FTPing, put your “press quality” PDF in the resultant folder, zip it or stuff it, then send it to us.  If you’re bringing it in on a thumbdrive or CD, same thing, you just don’t have to zip it if you don’t want to.  Just give us the resultant file and folder, and a PDF, and you’re gold. 

PS  Be sure to give your file a specific name, not just “business cards.”  Just think of how many resumes you get whenever you list a job which have the filename “resume.doc.”

Oh, we hear so many versions of this question!

  • It prints fine on my $50 printer at home; why are the colors all off on your $50,000 printer?
  • Why, oh, why, oh, CMY… K?
  • Why doesn’t it look like the monitor?
  • Why is the blue on my PowerPoint coming out purple?
  • My logo is and has always been this exact shade of red.  It looks fine on your screen–right there!  Why is it a different shade when it prints out?

Okay, I’ll calm down now and tell you the answer…  Forgive me if I dilate too much in my explanation. 

Projected light is a combination of three colors: Red, Green, and Blue.  A tube-TV has big red, green, and blue bulbs which combine to make your TV image.  From the TV there are often separate red, green, and blue cables to plug into the DVD player.  Projected light is a combination of three colors, and if you shine the whole rainbow at once, you see white light.  Combinations that sum to perceived white (projected light) are called “additive” colors.

Reflected color consists mostly of four colors: Cyan, Magenta, Yellow, and Black.  If you put all these together it will look black.  Back in the day we said, “The primary colors are red, yellow, and blue.”  These also combine to form black (but aren’t accurate enough now that we have computers.)  Color “gamuts” that combine to form black are called “subtractive” colors.

So consider if you had one painting palette of red, green, and blue; and another of cyan, magenta, yellow, and black.  You “could” get the same colors out of both mixes, but it would be difficult.  That’s what we do at Ram, and one more reason those who push the big green button on the copier all day need degrees in art.  But most programs just design for one type or the other–PowerPoint is a projection program, so printing off a PowerPoint file will always be in RGB and you’ll always lose your color accuracy.  Again, I’m not saying to blame Bill Gates–blame the universal laws of physics.  If you pull your logo off your website, the color will be wrong and there’s very little anyone can do about it.

In other words, if you take a picture on an amateur uncalibrated camera, which only takes pictures in RGB; then review it and color correct it on a different uncalibrated amateur RGB monitor, then if you like it you ask Windows to randomly attempt to mix those same colors in CMYK on your uncalibrated printer; the results will be hit and miss.  (There is no such thing as an RGB printer or a CMYK monitor or camera.)  So then you play with it and play with it until it looks perfect off your printer, and are pleased with yourself.

Then you bring it to Ram, because after all, if your printer looks good then ours must look great!  Thanks for the compliment.  But remember, you had to jerry-rig your camera, monitor, and printer to get it to look like this.  At Ram everything we have is professional and calibrated daily with big expensive lasers, but therefore and by definition it won’t look like your duct-taped printer.  And we still have to go through a highly precise RGB to CMYK conversion, which will result in a rendering of the file exactly how it looks, but that may be different than you expect. 

So what can you do? 

Short answer:

  • nothing, it’s just part of the game. 

Long answer:

  • Give us a PDF saved as “Press Quality” (not High Quality.) 
  • Convert everything to CMYK on your end as you’re building your document.  (Starting with Office 2007 you can even do this in Publisher.)
  • Design downward!  Find a lovely RGB to CMYK converter on the net and use it to make everything look strategically wrong on your monitor.  (Add extra magenta into your blues, increase the contrast higher than is comfortable, etc.)
  • And as always and above all, call us with questions.  If anything in this article confused you, you probably won’t master the topic before your project is due.  Oh, and higher than that, have fun!

Which programs do you accept? (also known as “Do you take ___________ files?)

Short answer: we can take most any program. Just get us what you have and we’ll run with it.

Short answer #2: If you save your file as a PDF, it doesn’t matter what program it was created in or whether we have it. We can open it. Just try to send us the original file too in case something needs to be changed.

Long answer: Certain programs are designed to ready your idea for commercial output, while other programs exist for other equally-valid purposes. For example, the core competency of Microsoft Word is writing, not layout. If you write something in Word, you can never be sure whether, on another computer, the fonts will look the same or how many words will fit on a line. Word was just never designed to precisely reproduce colors or layers of fonts. That being said, it’s a great program for writing letters and resumes and books that have few pictures. If you have a layout program such as Quark, use that. But people with Quark won’t be reading this article…

Any program can be set up to create a PDF from any file. That’s the ideal way of submitting a file to us, because the whole format was created solely to take existing files and make sure they were embedded with all the necessary features to reproduce on another computer. If you save your Word file, or Excel file, or Illustrator file, or whatever, as a PDF, it will most always look exactly the same on almost every computer. That’s why when you download an owner’s manual or flier somewhere on the internet it’s always a PDF with fonts embedded. Yes, it is possible to turn off the embedding of fonts in your PDF creator, but that’s too rare to discuss here…

To review the last two paragraphs, the key issue isn’t the content, but the supplementary files that most people never think of. It’s not whether we’ll see all the words, it’s whether we have the same font as you, or whether we have access to the picture you included in your flier. Besides a PDF, this can also be accomplished in most programs through some form of “prepare for commercial output” feature. Here are some standard examples:

  1. Microsoft Word – We can open any version of Office programs. If you’re using the PC version, under File, Save As, there will be a Tools button, then a Save Options possibility. Click there and make sure you “Embed Fonts in the File.” Then make sure that whatever photos you use in your document are sent to us. So if you have a Valentine’s Day party invite with 3 little clip-art cherubim angels around the border, be sure you give us 4 files (one for the document and 3 for the cherubic pictures.) *NOTE: There is no way on the Mac to embed fonts into a Word document!* You’ll just have to give us the actual font files or design it in a font that you’re 100% sure we have, or, the easiest option, Save As PDF (but then we can’t edit it, so know that.)
  2. Microsoft Excel, PowerPoint, etc – pretty much the same thing as Word (see above.)
  3. Adobe Illustrator – We have all versions of the Adobe Suite, including CS4. Industry standards still revolve around CS2 for the Mac. Just save as .EPS and outline your fonts. Again, you may also want to include your fonts anyway in case any changes need to be made. Be sure to include ALL the fonts.
  4. Adobe Photoshop – Again, we run CS4 but mostly receive files downsaved to CS2–that’s simply the current standard. Whatever the downsave, include the unlayered PSD file and all fonts; because once you flatten the image, the text will rasterize and can’t be blown up or edited anymore. It’s incredibly common that people design beautiful things on a flier, give us a file, and when we open it the file is only saved as 4″ wide at 100 dpi RGB. Or–this is really common–their “designer” only has experience in web design, and saves everything in 72 dpi RGB. All your work needs to be at least 300 dpi at full size, and CMYK. If it’s not in CMYK we’ll have to convert it and we can’t be responsible for the (in)accuracy of the resultant file.  If elements are completely vectorized through Illustrator or the like, include those supporting files too.
  5. Adobe InDesign – File, Package will compile the files we need.
  6. Quark Xpress – We mostly run 6.52 on the Mac. File, Collect for Output will include everything and warn you what you’re missing. Be sure to include ALL the fonts (it may complain about some.)
  7. JPGs, TIFs, BMPs, GIFs – nothing to worry about with a photo, just know the files need to be at least 300 dpi at full size and cannot be unflattened by us. Normally if someone’s submitting a JPG that didn’t come off their camera it’s because they gleaned it off the internet (albeit often their own site), and therefore is only saved at 72 dpi. And, again, printing is CMYK while your monitor is RGB–so if you’re picky about color, you will always be better off in life defining a color profile and using CMYK (or if you prefer lab color or Adobe RGB.)
  8. BLUEPRINT FILES – Blueprints should come as PDFs to size and scale –but there are still reasons to submit requests in other sizes.  We print in ratio not scale.  When making special size requests please refer to either sheet size (18×24 etc.) or percentage ratio, ie 50% etc. We can print b/w blueprints up to 36×48″ and color options even larger. And we don’t use cheap paper, either, and study after study shows that makes all the difference.

Again, we (unofficially) accept any format, and most days receive files in PageMaker, WordPerfect, Visio, iWork Pages, and binary code written straight onto napkins.

This was a lot of information. Please call with any questions.